- Home/
- Displaying items by tag: Eddycurrent flaw detectors
Abstract. The family of portable eddy current (EC) flaw detectors developed in Ukrainian enterprise ULTRACON-SERVICE LLC can satisfy different demands of NDT customers. These instruments were developed for application in hand held mode in field (for example airport) conditions. So the main features of these instruments are really small size, weight and possibility to be operated by one hand with EC probe operation by another hand. The ULTRACON-SERVICE family of EC flaw detectors includes the following instruments: EDDYCON VD 3-81; EDDYCON C and EDDYCON D. The EC flaw detectors of this family are widely used in different countries. For this purpose different languages (from English or Russian to Chinese or French) can be called out easily. Some significant applications (such as the detection of subsurface defects in aluminium alloy welding, the detection of defects on hole side wall, the detection of defects in multilayer aircraft components, the detection of defect in fillet zones of titanium disks etc.) can demonstrate the possibility of these instruments to solve most complicated inspection problems in different industries. Special two-frequency or differential filtering algorithms can serve for additional suppression of different types of noise. The latest EDDYCON D flaw detector is equipped with up to 32 channels and has high enough (23 kHz) sampling rate for productive automated inspection systems creation. For measurements of conductivity and thickness of nonconductive coating the instruments are implemented with special effective algorithms based on absolute type EC probe signal phase analyzing. The unique and newest application of these instruments is the possibility to estimate stress state in ferrous steel components by specially developed magnetic anisotropy EC probes.
Introduction
|
The majority of modern eddy current (EC) flaw detectors developed by different producers have universal properties and support next performance capabilities: |
|
All presented features and demands were realized in EDDYCON type EC flaw detectors developed in SPF “Ultracon-Service” (Kiev, Ukraine). EDDYCON type EC flaw detectors can satisfy different demands of NDT customers. In this paper the main characteristics of EDDYCON type EC flaw detectors are presented and some applications are shown.
1. EDDYCON type Flaw Detectors
Ultracon-Service family of EC flaw detectors is composed of the following instruments: EDDYCON B (VD3-81) [1-4]; EDDYCON C [5] and EDDYCON D. For better comparison the main specifications of EDDYCON type flaw detectors are presented in the compiled table 1.
Table 1. Specifications of EDDYCON type flaw detectors
| Flaw detector | Eddycon VD3-81 | “Eddycon C” | “Eddycon D” |
| Frequency range | 50.0 Hz – 12.0 MHz | 10.0 Hz – 16.0 MHz | 10.0 Hz – 16.0 MHz |
| Phase | 0-360º with 0.1º, 1º, 10º, 100º increments | 0-360º with 0.1º, 1º, 10º, 100º increments | 0-360º with 0.1º, 1º, 10º, 100º increments |
| Pre-gain | -6.0 to 40.0 dB with 0.1; 1 and 10 dB steps | -6.0 to 40.0 dB with 0.1; 1 and 10 dB steps | -6.0 to 40.0 dB with 0.1; 1 and 10 dB steps |
| Gain | 0 to 30 dB with 0.1; 1 and 10 dB steps | 0 to 30 dB with 0.1; 1 and 10 dB steps | 0 to 30 dB with 0.1; 1 and 10 dB steps |
| Extra gain | - | 30 dB with 6 dB step | 30 dB with 6 dB step |
| Generator output voltage | 0.5 V, 1V, 2V, 4V, 8V | 0.5 V, 1V, 2V, 4V, 6V | from 0.5 V to 20V |
| Sampling frequency | 1 to 8 kHz | 1 to 10 kHz | 1 to 23 kHz |
| Filters | Conventional High Pass, Low Pass and Band Pass. Additional Differential or Average Modes | Conventional High Pass, Low Pass and Band Pass. Additional Differential or Average Modes | High Pass, Low Pass and Band Pass |
| Test modes | Single, Two frequency and Mix | Single, Two frequency and Mix | Single, Multi frequency and Mix |
| Flaw alarm | Circle, Level, Sector or Trapezium | Circle, Level, Sector or Trapezium | Circle, Level, Sector or Trapezium |
| Setting number | 500 | 500 | In accordance with PC memory |
| Interface | USB 2.0 | USB 2.0, Ethernet | Ethernet |
| Casing | 188 mm x107 mm x 78 mm | 230 mm x 135 mm x 98 mm | 141 mm x 37 mm x 251 mm |
| Temperature range | -20ºC to + 40ºC | -20ºC to + 45 ºC | -20ºC to + 45 ºC |
| Internal power | Ni-MH Battery with 4,5 hours life 12V/2700 mА.h | Li-Ion Battery with 8 hours life and 3 hours full charge time | - |
| External | AC – 100-240 V, 50-60 Hz, 50 Watts | AC – 100-240 V, 50-60 | DC – 12 V |
EDDYCON VD 3-81 (Fig. 1) and EDDYCON C (Fig. 2) flaw detectors were developed for application in hand held mode in field (for example airport) conditions. So the main features of these instruments are really small size, weight and possibility to be operated by one hand with EC probe operation by another hand [1-5]. The form of the instrument case is very comfortable and realizes optimal weight distribution on the operator palm. Thus, these flaw detectors are portable and light instruments with an easy-to-use function keys and independent power supply. The instruments side-strip menu is user-friendly to an operator. High-power software and integrated circuit logic allow applying the efficient algorithms for the signal processing. Flaw detectors can be provided with rotary scanner and scanning encoder. The EC flaw detectors of this family are widely used in different countries. For this purpose different languages (from English or Russian to Chinese or French) can be called out easily.
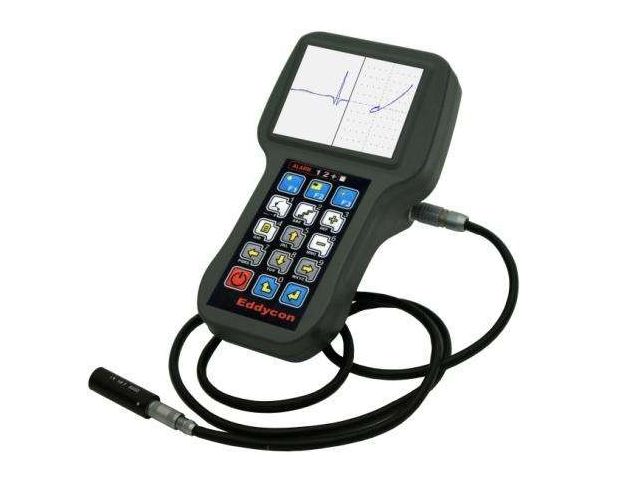
Fig. 1. EDDYCON VD 3-81 eddy current flaw detector.
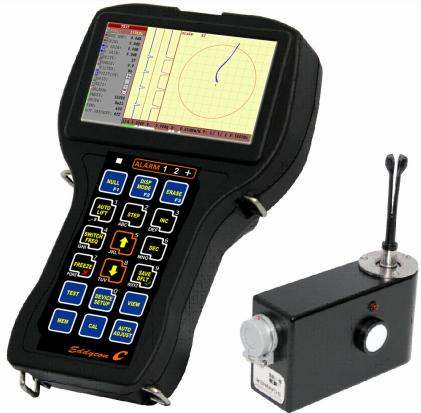
Fig. 1. EDDYCON C eddy current flaw detector and rotary scanner.
Different types of EC probes were designed for these flaw detectors to satisfy various applications. High-frequency EC probes are applied for surface fatigue cracks detection in fuselage skinning, strength structural members, wheel hubs and etc. Thus, developed several EC probes, due to the variety of shapes, simplify the access to the testing zone. In particular, special-purpose EC probes are designed for the surface cracks detection on the tapped surface of the countersink rivet hole. EC flaw detectors can be supplied with special absolute type EC probes for conductivity measurements. The most difficult inspection problems of subsurface flaw detections were successfully solved with multidifferential (double differential) type EC probes [6]. The unique and newest application of these instruments is the possibility to measure stress state in ferrous steel components. For this purpose special magnetic anisotropy EC probes were developed. The latest EDDYCON D flaw detector (fig. 3,4) is equipped with up to 32 channels and has high enough (23 kHz) sampling rate for productive automated inspection systems creation including the array type probes application.
.jpg)
Fig. 3. EDDYCON D eddy current flaw detector (general view).
|
|
|
|
Fig. 4. EDDYCON D eddy current flaw detector (front and back panels). |
|
For measurements of electrical conductivity and thickness of nonconductive coating (or gap between EC probe and inspected surface) EDDYCON C flaw detector is implemented with special effective algorithms based on absolute type EC probe signal phase analyzing. The calibration curve can be created by customer manually in special calibration mode (fig. 5) by application of special reference standards, which represent the range of conductivity and nonconductive coating gap measurements application.

Fig. 5. The menu for calibration curve creation
2. Some Examples of EDDYCON type Flaw Detectors Applications
2.1 Fatigue Cracks Detection on the Holes Side Wall in Dynamic Mode
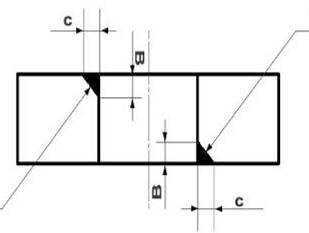
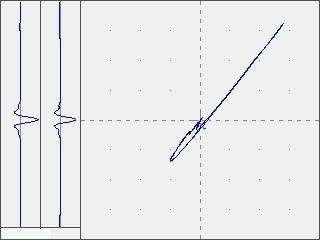
During aircraft maintenance the focus attention is given to the holes after rivets removing and others, because these areas are critical due to the stress concentration. To improve defects detection productivity on the holes side wall, the flaw detectors are equipped with a rotary scanner (Fig. 2) and supplied with required filters [1]. Examination of EC probes for the holes inspection was carried out using NDT 1016 type reference standard produced by “NDT Engineering Corporation” with two angular like crack defects (Fig. 6, left). Smallest defect has a length of c=0.51 mm and a depth of b=0.51 mm. In Fig. 6 (right) there are signals from this defect, which show the high sensitivity with high signal to noise ratio.
|
|
|
|
Fig. 6. Reference standard for calibration of flaw detector for hole inspection (left) and signal responses from smallest crack (right). |
|
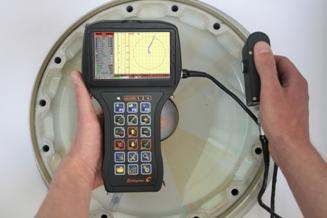
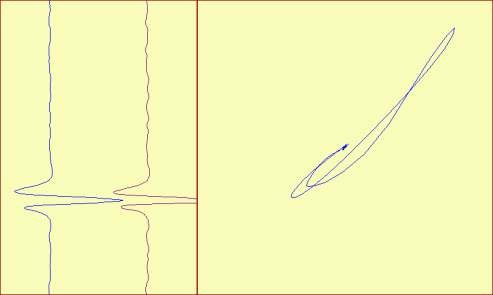
Fig.7 shows the procedure of wheels hubs bolt holes testing in dynamic mode after their dismantling (left) and the flaw detector signal received during the fatigue crack of 0.56 mm depth (right) detection.
|
|
|
|
Fig. 7. Inspection of wheels hubs bolt holes in dynamic mode (left) and the signal from the fatigue crack (right) on the side wall. |
|
Fig. 8. Inspection of pressure bulkhead fastener holes using flaw detector EDDYCON C and rotary scanner.

Fig. 8 shows the procedure of pressure bulkhead fastener holes testing.
2.2 Detection of Internal Defects in the Five-layer Units in Sliding Mode
The most difficult task is to detect subsurface cracks in rivet zones without their remove. This problem arises when testing multilayer covering near the doorway of aircrafts "Boeing 737-300, 737 400, 737-500" in cuts zone under the door hinge fittings. The difficulty consists in necessity of cracks detection that may arise and develop from rivets, at a depth from 3.6 to 6.1 mm in different layers of five-layer one-piece unit with a total thickness of 13.68 mm. Defect location in the 4th layer is shown in Fig. 9 (left).
|
|
|
|
Fig. 9. Crack location in the 4-th layer of five-layer specimen (left) and received signals (counterclockwise) from this defect, from the defectless rivet and for lift-off (right). |
|
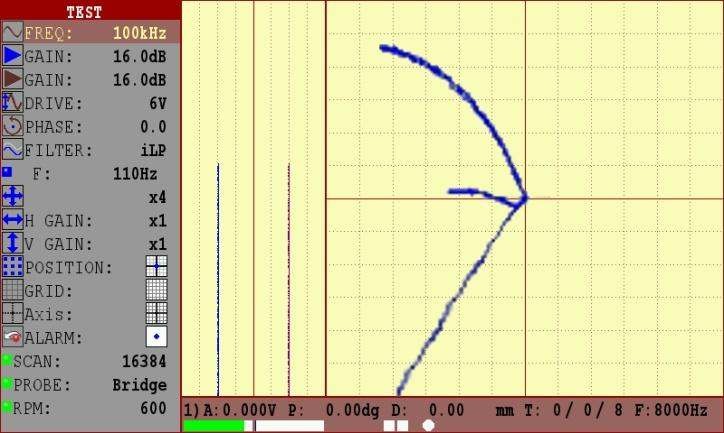
To solve this problem a sliding absolute type EC probe was developed [4]. It is needed to notice that such type of probe does not provide lift-off influence suppression. Thus, the separation of lift-off influence must be achieved by the analysis of signals peculiarities in a complex plane. The EC probe tests were carried out on the sample of NDT 3049 type of “NDT Engineering Corporation” at the operating frequency of 500 Hz. Fig. 9 (right) shows signals from the crack of 16,5 mm length at the depth of 6,1 mm in a 4th layer of the sample (Fig. 9, left). For the selective interpretation possibility assessment signals from defectless rivet and lift-off influence are also presented. Signals from defectless rivet are oriented in horizontal direction of a complex plane. Lift-off signals are oriented downward from the balance point. Analysis of received signals shows the possibility of clear signals separation obtained from defects, such as cracks in rivets zone at a depth of 6 mm from the signals of defectless rivet and from the lift-off. Presented results have confirmed that proposed procedures based on developed low-frequency EC probe and EDDYCON type flaw detectors can be successfully realized for “Boeing” aircraft components inspection.
2.3 Detection of Subsurface Defects in Arc Welding
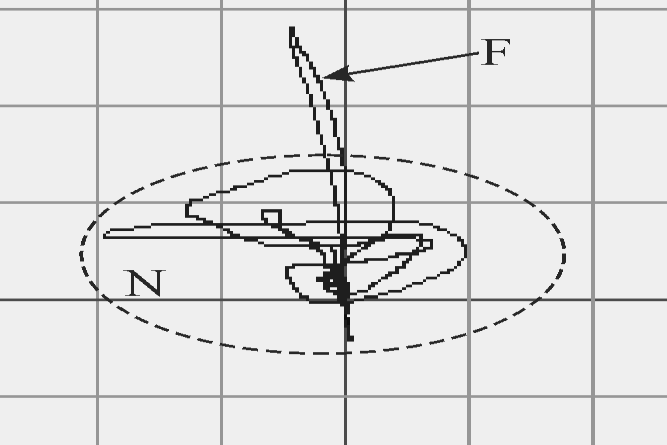
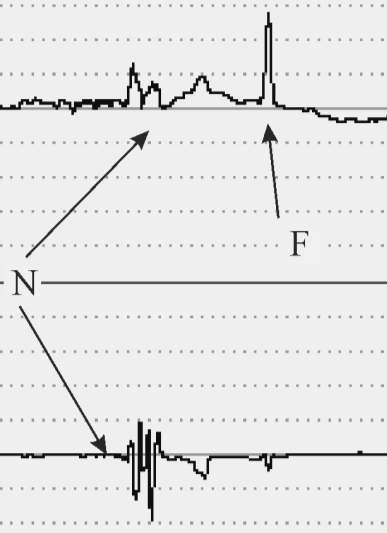
There is high enough noise during EC probe scanning due to the heterogeneity of electrophysical parameters and geometric deviation in welded zone. This specific noise can limit the sensitivity and depth of inspection. For inspection of arc welding, the low frequency MDF 0801 type double differential EC probe was applied. Fig. 10 shows the signals in complex plane (left) and in time base mode (right) from the subsurface like crack defect with 3 mm depth of bedding (identified by F), which can be compared with the structural noise (circled and identified by the dotted line N). Separation of the signals produced by defects and structural changes were enhanced by complex plane rotation and different signal amplification along the vertical and horizontal axes. The gain along vertical axis was 6 dB more than gain along horizontal axis. It can be seen that the vertical component of a signal from a defect of about 6 dB greater than structural noise, which is particularly essential on the vertical signal component in time base mode (fig. 10, left above). Such signal-to-noise ratio is considered sufficient for reliable detection of the defect. These signals show the possibility of separating the useful signals from the subsurface flaw lying even on the 3.0 mm depth from the structural noise.
|
|
|
|
Fig. 10. Structural noise and signal from subsurface flaw with 3 mm depth of bedding in complex plane (left) and in time base mode (right). |
|
2.4 Detection of Surface Defects in Components with Roughly Finished Surfaces
Special reference standard with artificial flaws and RZ 320 surface roughness was developed to demonstrate possibility to detect defects in components with roughly finished surfaces. Signal responses obtained on the operational frequency 17 kHz with MDF 1201 type EC probe application are presented on fig. 11. Presented signals were obtained from 0,6 mm depth and 10 mm length crack with differential signal processing with 10 signal samplings.
|
|
|
|
Fig. 11. Crack signal responses after differential signal processing in complex plane (left) and in time base mode (right). |
|
These results show that EDDYCON type flaw detectors in connection with double differential EC probe and simple differential signal processing algorithm can be effectively applied for cast rolling stock component inspection [2].
Conclusions
EDDYCON type flaw detectors were developed as convenient instruments with universal properties, able to solve most difficult problems of EC inspection. Some results of subsurface crack detection in multilayer aircraft components, aluminum alloy arc welding in aerospace constructions, side surfaces of bore holes and steel castings with roughly finished surfaces are presented.
References
[1] A. Dshaganjan, V. Uchanin, A. Opanasenko, G. Lutcenko, ‘New Hand-Held Eddy Currents Flaw Detector‘, Proc. 18th World Conference on Nondestructive Testing, Durban (South Africa), 2012 (conference CD or www. ndt.net).
[2] V. Uchanin, G. Lutsenko, V. Lepekha et al., ‘Eddy Current Inspection of Steel Castings with Roughly Finished Surfaces‘, 10 European Conf. on Nondestructive Testing, Moscow, 2010 (Conference CD or www. ndt.com).
[3] V. Uchanin, A. Dshaganjan, A. Opanasenko, ‘Application of VD 3-81 Eddycon flaw detector for Boeing aircraft units operational inspection‘, NDT world, № 4 (58), pp 77-80, 2012 (in Russian).
[4] V. Uchanin, A. Opanasenko, ‘Application of VD 3-81 Eddycon type flaw detector for detection of flaws in thread elements of oil-and-gas equipment‘, NDT world, № 1 (59), pp 49-51, 2013 (in Russian).
[5] A. Dshaganjan, V. Uchanin, A. Opanasenko, G. Lutcenko, ‘New portable eddy current flaw detector and application examples‘, 11 European Conf. on Nondestructive Testing, Prague, 2014 (Conference CD or www. ndt.com)
[6] V. Uchanin, 'Surface double differential type eddy current probes', Lviv: Spolom, 2013, 267 p (in Ukrainian).
For regular flights many airlines use "Boeing 737-300, 737-400, 737-500" aircrafts. These aircrafts operational NDT is carried out in accordance with the manual of "Boeing” company (NDT Manual for Boeing 737), where methodical recommendations are given for each block, in particular: requirements for instruments and eddy current probes (ECP), scanning trajectory, calibration blocks with artificial defects and signals received from defects and interfering factors by means of calibration blocks.
Eddy current flaw detector Eddycon C is referred to the testing and evaluation means. It is designed for manual testing by eddy current technique for the presence of surface and subsurface defects, such as discontinuity of the material (cracks, overlaps, holes, fine cracks, etc.).
The EDDYCON D universal multi-channel eddy current flaw detector is designed to solve a wide range of tasks of eddy current flaw detection.
LATEST NEWS
OKO Association’s new website
A few decades ago, within first years of its establishment, ULTRACON-SERVICE, SPE didn’t set a task to supply its own-made equipment outside of borders of the native lands. Nowadays, being part of OKO Association, we cooperate with many countries around the world, and this year we plan to expand our business contacts list with the companies from Southeast Asia. OKO Association has recently opened a website www.okondt.cn for this region, and now the information about equipment produced by our company is available in Chinese.
Resilient packaging for single rail trolleys transportation and storage!
A lot of products developed by the RPC “Ultracon-Service” cover hundreds and even thousands of kilometers before they reach the customer’s site. Transportation of the equipment is carried out by the overland or air transport. The equipment is thoroughly checked before shipment, and it is important for us to be totally sure that each device will be delivered to the customer in the same condition in which it left our site.
Research and Production Company ULTRACON-SERVICE at Polish Conference and Exhibition KKBN-2018
Increasing requirements for the quality and safety of industrial equipment, the need to check its condition without taking it out of service made the countries of Eastern Europe paying more attention to the non-destructive testing issues.Aimed at exchanging experience, discussions, studying of the latest methods and developments the local and regional forums are held. One of such events became the 47th NDT Exhibition and Conference in Poland – the KKBN-2018, in which, by invitation from our Polish partner PCB Service company, the representatives of the RPC ULTRACON-SERVICE as a part of OKOndt GROUP™ took part.
ASNT Annual Conference 2016
24-27 Oct
Long Beach, CA 24-27 October 2016

Equipment
-
SONOCON FOCUS Phased Array Ultrasonic Flaw DetectorThe instrument is intended…
-
EDDYCON C Eddy Current Flaw DetectorEddy current flaw detector…
-
EDDYCON D Eddy Current Flaw DetectorThe EDDYCON D universal…
-
OKO-22M-EMA Multi-Channel Flaw DetectorThe ОКО-22М-EMA ultrasonic flaw…
-
ОKО-22М-UT Ultrasonic Multi-Channel Flaw DetectorThe ОКО-22М-UT ultrasonic flaw…
Enter site
All Rights Reserved © «Ultracon-Service» LLC.


.jpg)
.jpg)
