Abstract. Eddy current (EC) module was developed for in-line inspection of railroad rails after rolling process in accordance with normative documents GOST R 51685-2013 and EN 13674:1-2004. The developed EC module enables the automatic 56-channel detection of surface defects in the head (including the lateral faces) and the foot zones of the rails with high enough speed up to 2 m/sec. Special multidifferential type EC probe with 13 mm operational diameter was developed to fulfil the strict requirements of high sensitivity to cracks with high clearance between operational surface of the probe and inspected surface of the rail needed for durable inspection in high-speed automated mode. The EC system provides detection of the longitudinal and transverse crack defects with depth 1.0 mm and defect length 20 mm or defects with depth 1.5 mm and defect length 10 mm. For the developed probes, the optimal inspection conditions were obtained for operational frequency 100 kHz. EC system involves the EC multi-channel unit "OKO-25VT", specialized scanners for head and foot inspection, 56 EC probes and system for approaching motion and return of the scanners. The developed module can be installed in production line as a part of combined inspection system based on EC, ultrasonic immersion and EMAT methods to provide the detection of defects in the entire volume of the rails.
Introduction
Durability and safety of railway traffic are influenced on the “rail–wheel” interaction, especially in the condition of elevated speeds and loads typical for modern railway industry. Thereby, one of the most fruitful ways to reach the increased demands is the guaranteeing of the high quality of rails at the production stage. For this purpose, many efforts of scientists and engineers are directed to development of more sensitive and effective NDT technologies for detection of different kinds of defects in the inspected rails. It is known that the most effective NDT technologies for rail inspection can be created on the base of ultrasonic method in combination with eddy current (EC) method [1,2]. In this case, the synergetic effect is manifested because the ultrasonic methods have high enough sensitivity to the defects in the rail volume, and modern EC methods are very effective for surface flaw detection [2,3]. Let us notice that the applications of the different variants of EC method for rail inspection are the subject of many investigations and designs oriented to application in the production lines and in-service conditions [1-5]. It is known that the high noise (first of all - lift-off) suppression is required for sensitive and effective EC method application, especially in automatic mode. For this purpose, the additional rotating EC probes were applied in the in-line inspection system [1]. High sensitivity with high lift-off suppression can be achieved by multidifferential (double differential) EC probes, which were successfully applied in our previous developments [3,6-8]. The high productivity can be provided by multichannel system creation, such as in the automatic systems for axle and wheel inspection. In ULTRACON-SERVICE LLC, the automatic system for combined (ultrasonic, EMAT and EC) testing of railroad rails in the rolling-mill shop was developed for in-line inspection of rails after rolling process in accordance with normative documents GOST R 51685-2013 and EN 13674:1-2004. In this paper, the part of this system – EC multi-channel module for in-line high-speed inspection is presented.
1. Eddy Current Module for In-line Inspection of Rails
Eddy Current Probes and Scanners
|
The main demands to EC probes, which can be applied for computer-aided EC system creation, are: |
|
Our previous investigations show that the multidifferential (double differential) EC probes are very effective for automated system creation [3,6-8]. These probes are combined of 2 driving and 2 sensitive coils, the axles of which are spaced in transmit-receive configuration. For automatic inspection of rails without defect missing, a special multidifferential type EC probe with 13 mm operational diameter and 6.0 mm sensitivity width was developed. The maximum sensitivity for detection in ferrous steel was determined on operational frequency 100 kHz. Executed investigations show that for inspection of rails with high enough speed (up to 2 m/sec), 56 EC probes are needed to cover all inspected surface without transverse scanning. On the whole, 25 EC probes were applied for detection of defects in the rail head, including the lateral faces (Fig.1), and 31 EC probes were applied for rail foot inspection (Fig.2).
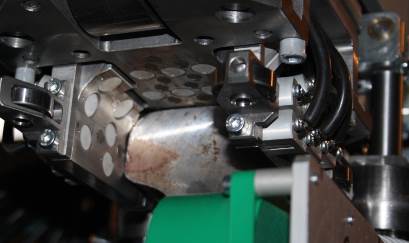
Fig. 1. The assembly of eddy current probes for rail head inspection.
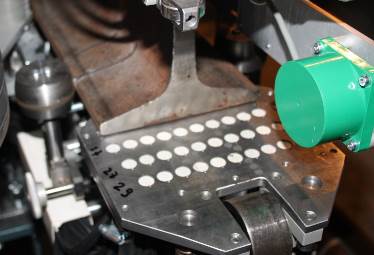
Fig. 2. The assembly of eddy current probes for rail foot inspection.
Eddy Current Module Characteristics
The EC module provides detection of the longitudinal and transverse crack defects with depth 1.0 mm and defect length 20 mm or defects with depth 1.5 mm and defect length 10 mm. The developed module can be installed in production line as a part of combined inspection system based on EC, ultrasonic immersion and EMAT methods to provide the detection of defects in the entire volume of the rails (Fig. 3,4).
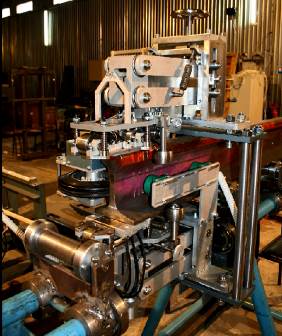
Fig. 3. Inspection system for combined (EC, ultrasonic immersion and EMAT) in-line inspection of rails after rolling process (general view).
For prevention of EC probes case breakup due to high-speed movement of the rail during testing, some clearance between the operational surface of the probe and inspected surface was introduced. Each EC probe was supplied with the compressed air nozzle for scale cleaning.
Scanners for inspection of rails head and foot have an independent suspension. The suspension mechanisms guarantee two degrees of freedom – in vertical and horizontal planes. The freedom of moving in vertical plane ensures the protection of scanners against damage by a hooked end of a rail, or by a rail of bigger size. The freedom of moving in horizontal plane provides the self-positioning of scanners and eliminates the negative influence of rail horizontal bending on inspection results.
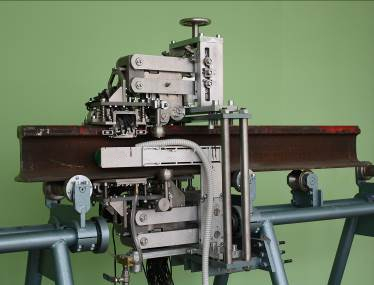
Fig. 4. The scanning unit (guide roller, encoder and mechanisms for tuning to defined type of inspected rail).
For EC module adjustment, special reference standards with electro-discharged cracks defects of longitudinal and transverse orientations were developed. Figures 5 and 6 represent the working drawings of reference standards developed for R65 type rail.
.jpg)
.jpg)
Fig. 5. Reference standard for simulation of defects in rail head.
.jpg)
.jpg)
Fig. 6. Reference standard for simulation of defects in rail foot.
The displays of EC module for rail inspection in different modes are presented on Fig. 7-9.
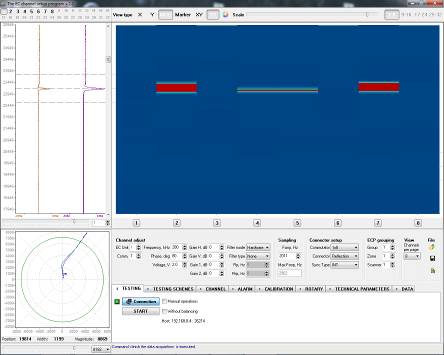
Fig. 7. Two-dimensional representation for longitudinal and transverse defects (depth - 1 mm, length - 10 mm, width - 0.5 mm) in the rail head.
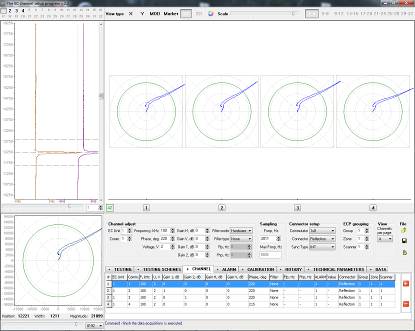
Fig. 8. XY display representation for transverse defect (depth - 1 mm, length - 48 mm, width - 0.5 mm) in the rail head.
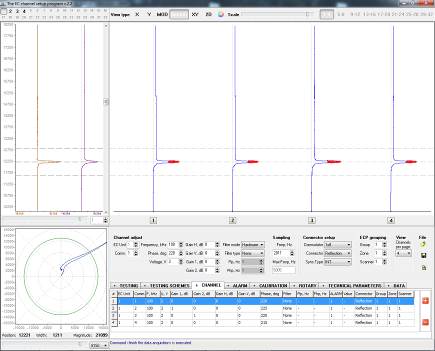
Fig. 9. The representation in display mode "MOD" with "Marker" function for transverse defect (depth - 1 mm, length - 48 mm, width - 0.5 mm) in the rail head.
2. Conclusion
EC multi-channel module for in-line high-speed inspection of railroad rail developed in ULTRACON-SERVICE LLC company is presented.
References
[1] M. Raj, D. Mallik, S. Bansal, R. Saina, R. Ajmeria, ‘Non-Destructive Testing and Inspection of Rails at JSPL – Ensuring Safety and Reliability‘, Proc. 18th World Conference on Nondestructive Testing, Durban (South Africa), 2012 (conference CD or www.ndt.net).
2] H.-M. Thomas, T. Heckel, G. Hanspach, ‘Advantage of a combined Ultrasonic and Eddy Current Examination for Railway Inspection Trains‘, 9-th European Conf. on Nondestructive Testing, Berlin, 2006 (Conference CD or www.ndt.com).
[3] G. Lutcenko, V. Uchanin, V. Mischenko, A. Opanasenko Eddy Currents Versus Magnetic Particles, 18th World Conference on Nondestructive Testing, Durban (South Africa), 2012 (Conference CD or www. ndt.com).
[4] Z. Popović, V. Radović, L. Lazarević et all, ‘Rail inspection of rcf defects‘, Metalurgija, 2013, 52, 4, pp. 537-540.
[5] Z. Song, T. Yamada, H. Shitara, Y. Takemura, ‘Detection of Damage and Crack in Railhead by Using Eddy Current Testing‘, Journal of Electromagnetic Analysis and Applications, 2011, 3, pp. 546-550.
[6] V. Uchanin, G. Lutsenko, V. Lepekha et al., ‘Eddy Current Inspection of Steel Castings with Roughly Finished Surfaces‘, 10 European Conf. on Nondestructive Testing, Moscow, 2010 (Conference CD or www. ndt.com).
[7] A. Dshaganjan, V. Uchanin, A. Opanasenko, G. Lutcenko, ‘New portable eddy current flaw detector and application examples‘, 11 European Conf. on Nondestructive Testing, Prague, 2014 (Conference CD or www. ndt.com).
[8] V. Uchanin, 'Surface double differential type eddy current probes', Lviv: Spolom, 2013, 267 p (in Ukrainian).


