- AIRCRAFT
testing of aeronautical engineering parts (wheel disks, covering, turbine blades, multilayered constructions, holes of various kinds etc.); - OIL-AND-GAS
testing of pipelines, turbine blades of gas-distributing station (GDS), pressure vessels, etc.; - CHEMICAL
testing of pipelines, industrial tanks etc.; - POWER
testing of steam generator pipes by inner bobbin eddy current probes, collectors etc.; - MACHINE BUILDING
testing of rods, wire, metalwares, forming rolls, sheet metals etc.
Flaw Detector Advantages
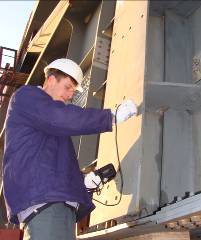 Possibility of tuning out from the influence of operating liftoff and inhomogeneity of electromagnetic properties of testing material;
- storage of a great number of setups and testing results in the flaw detector memory;
- mode of two-way connection with PC via USB port (for inputting the information from the flaw detector memory into PC and possibility of this data printing out as well as setups loading from PC into the flaw detector memory);
- availability of a temperature probe and a remote balancing button;
- possibility of conditional defect depth and length evaluation;
- easily removable storage battery;
- time of contentious battery operation – 8 hours;
- sound and color ALARM system;
- operation simplicity due to the intuitive interface;
- small mass and dimensions parameters.
Flaw Detector Distinctive Features
- Color high-contrast TFT display;
- ALARM system: 4 three-color LEDs, sound alarm;
- possibility of operation in two-frequency mode;
- simplified procedure of instrument calibration on standard calibration blocks;
- possibility of encoder and eddy current rotary scanner connection;
- possibility of rapid measurement of the ratio signal/noise;
- USB slave;
Capabilities and Serivce Functions of the Instrument
- Possibility of defects detection with the depth – from 0,1 mm and width – from 0,002 mm;
- digital signal filtering (there are 5 filter types: Lowpass, Highpass, Bandpass, Differential, Averaging);
- eddy current signal display:
-
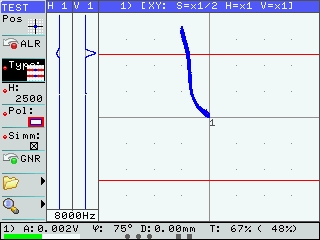
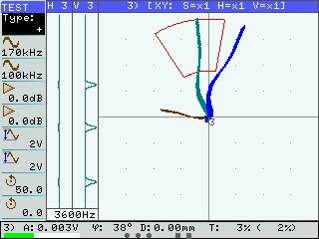
- a) complex plane (XY) – allows to detect defects among interferences by analyzing the signal waveform;
- b) generation of two channels can be used for suppression of interfering factors and reduction of their influence on testing results (for mixing an operator can choose one of 4 algorithms: addition, subtraction, addition with horizontal inversion and addition with vertical inversion).
 |
 |
|
a) |
b) |
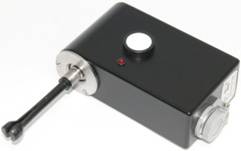
- two modes of instrument operation: day mode is used when operating in dimly lit places with insufficient visibility; night mode is used when operating in places with bright lighting, to increase the display contrast;
- time of flaw detector operation mode setup – up to 1 minute;
- autozap function (adjustable time of screen clearing in 0.1 s and 0.5 s, 1 s, 2 s, 3 s, 4 s);
- built-in clock and calendar;
- screen backlight and screen brightness control;
- congestion control of input channel;
- storage battery discharge level indication;
- possibility of connection and operation of ECPs of the following types:
- differential ECP;
- differential ECP connected according to the bridge scheme;
- differential ECP of transformer type with grounded centerpoint;
- differential ECP of transformer type;
- absolute (parametric) ECP ;
- absolute ECP of transformer type;
- possibility of eddy current rotary scanner connection for the testing of openings and special-purpose scanners;
- user-friendly multi-language interface;
- time of continuous flaw detector operation with the fully charged storage battery – at least 8 hours;
- total average life at least 10 years;
- flaw detector is powered from the built-in storage battery with rated voltage 12 V and rated capacity of 4500 mA•h;
- weight of flaw detector with a storage battery - no more than 0.9 kg;
- overall dimensions of flaw detector - no more than 230 mm × 135 mm × 98 mm.
| Main specifications | ||
| Frequency range | from 0.01 to 16000 | kHz |
| Gain | up to 100 | dB |
| Probe supply voltage | 0, 5, 1, 2, 4, 6 | V |
| Filter |
|
Hz |
| Changing of ECP signal phase | 0-360 | deg |
| Sampling frequency | up to 10 | kHz |
|
Possibility of eddy current rotary scanner connection for the testing of openings and special-purpose scanners |
||
| "Persistence" | 0, 1, 0.5, 1, 2, 3, 4 | s |
| Eddy current signal display |
|
|
| Defect alarm (alarm) | Circle, Threshold, Sector, Cut-off | |
| Display | Color TFT | |
| Screen resolution | 800 X 480 | pixel |
| Screen size | diagonal 4.3" | |
| Battery | 12 V and capacity of 4500 mA*h | |
| Weight | no more than 0.9 | Kg |
| Overall dimensions | 230 x 135 x 98 | mm |
| No. | ECP type | Sizes of working surface, mm | Operating frequency dimensions, kHz | Overall dimensions | Detected flaws |
| 1 | SS1.5M05DA0 | Ø 5 | 500-2000 | Ø 13×35 | Surface defects in different conductive materials (e.g. aluminum alloys, ferromagnetic and austenitic steels). |
| 2 | SS650K06DA0 | Ø 6 | 500-1500 | Ø 13×35 | |
| 3 | SS400K07DA0 | Ø 7 | 300-600 | Ø 13×35 | |
| 4 | SS300K08DA0 | Ø 8 | 200-400 | Ø 13×35 | |
| 5 | SS340K09DA0** | Ø 9 | 250-400 | Ø 13×35 | Surface and subsurface cracks, pores, corrosive defects in aluminum alloys, ferromagnetic and austenitic steels and etc. |
| 6 | SS170K13DA0** | Ø 13 | 100-250 | Ø 15×35 | |
| 7 | SS50K15DA0 | Ø 15 | 50-150 | Ø 15×50 | |
| 8 | SS10K33DA0 | Ø 33 | 1×100 | Ø 33×50 | |
| 9 | SU450K3A6×8A0 | 6×8 | 900-1700 | Ø 12.5×130 | Surface cracks in rectangular grooves of products made of ferromagnetic and austenitic steels and etc. |
| 10 | SU450K05DA0 | Ø 5 | 400-600 | Ø 12.5×70 | Surface cracks in aluminum alloys, ferromagnetic and austenitic steels and etc. |
| 11 | SU450K5A05DA0 | Ø 5 | 400-600 | Ø 12.5 ×135 | |
| 12 | SU1.8М3.5DSS0 | Ø 3.5 | 1000-1900 | Ø 9.6×55 | Surface cracks in aluminum alloys, titanium alloys and etc. |
| 13 | SU1.8М3А3.5DSS0 | Ø 3.5 | 1000-1900 | Ø 9.6×160 | |
| 14 | SU450K05DA4 | Ø 5 | 750-1100 | Ø 15×170 | Special-purpose ECPs for the reduction gearbox VR-26 testing of MI-26 helicopters. |
| 15 | SU300K08DA0 | Ø 8 | 100-450 | Ø35 ×150 | |
| 16 | SU350K6×0.5DA1 | 6×0.5 | 350-600 |
Ø 12×61 |
Testing for the presence of surface cracks in a metric thread with a step of 2 mm made on products of ferromagnetic material. Used with the SKV-MR-01 scanner. |
| 17 | SU350K6×0.5DA2 | 6×0.5 | 350-600 | Testing for the presence of cracks in a metric thread with a step of 4 mm made on products of ferromagnetic material. Used with the SKV-MR-02 scanner. | |
| 18 | SU350K6×0.5DA3 | 6×0.5 | 350-600 | Testing for the presence of surface cracks in metric thread with a step of 6, 35 mm made of ferromagnetic material. Used with the SKV-MR-03 scanner. | |
| 19 | SU350K6×0.5DA4 | 6×0.5 | 350-600 | Testing for the presence of surface cracks in a metric thread with a step of 1,5 mm made on products made of ferromagnetic material. Used with the SKV-MR-04 scanner. | |
| 20 | SU350K6×0.5DA5 | 6×0.5 | 350-600 | Testing for the presence of surface cracks in a metric thread with a step of 5,08 mm made on products of ferromagnetic material. Used with the SKV-MR-05 scanner. | |
| 21 | RO1.7M5A«X»*DRD0 | from ø3.1 to ø 25.4 |
1000-3500 | - | Rigid stainless steel. Detection of surface defects in parts holes made of aluminum alloysю ferromagnetic and austenitic steels. |
| 22 | RO1.7M5A«Х»*DFD0 | from ø3.1 to ø 25.4 |
1000-3500 | - | Delrin flexible. Detection of surface defects in parts holes made of aluminum alloys, ferromagnetic and austenitic steels. |
| 23 | SU30К16DD0 | ø 16 | 30-200 | ø 50×55 | Special-purpose probe for detection of surface cracks in fencing epees made of austenitic steels. |
*Where «Х» is the diameter of the ECP operating surface.
** Probes in protective case with wear-resistant protector


