https://ultracon-service.com.ua/index.php/en/probes/item/91-uds2-77-ultrasonic-single-rail-flaw-detector#sigFreeId4384a60c96
THE FLAW DETECTOR ADVANTAGES:
- Rail complete sounding (excluding the foot flanges), due to the flaw detector multi-channeling.
- Built-in standard setups for channels operation.
- Defining the traveled distance and speed during the complete testing.
- Real-time display of testing results in B-scan mode (by 4 channels).
- Sounding and storing the information in every millimeter of traveled distance via all channels is provided in the flaw detector.
- Recording the testing results at different sensitivity levels.
- Registration of all testing results and advanced capabilities of data analysis.
- Application of the flaw detector with the base sounding scheme allows to detect all types of fatal defects, appearing while rail track maintenance.

Fig. Displaying the testing results in A-Scan and B-Scan modes on the flaw detector screen
DISTINCTIVE FEATURES:
- Large high brightness color TFT display.
- Synchronization by encoder.
- Result display: А-scan, B-scan.
- Number of channels for complete testing: 13.
- Number of channels for manual testing: 2.
- Techniques and schemes for rail head sounding.
- Application of base and additional schemes for rail sounding:
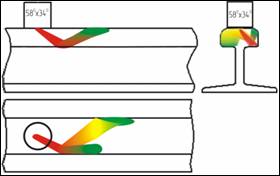
- Pulse echo by angle-beam probes for testing of the rail head center along and against the movement.
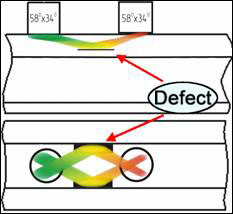
- Echo-mirror technique by angle-beam probes for testing of the rail head center along and against the movement.
- Echo-mirror for testing of gauge and field face sides along and against the movement.


Fig. Pulse echo techniques for the rail head testing


Fig. Echo-mirror techniques for the rail head testing
- Techniques and schemes for the web sounding and its projection into the foot:
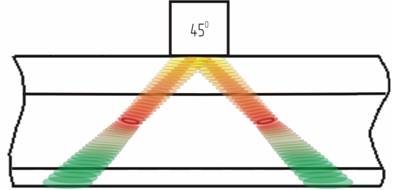
- Pulse echo technique for detection of transverse cracks and testing of weld joints with angle-beam transducer.


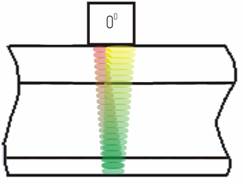
Fig. Pulse echo techniques for the rail web and foot testing
| UDS2-77 MAIN SPECIFICATIONS | ||
| Overall dimensions of flaw detector without a handle and with one ultrasonic unit and power unit | no more than (1040×1640×1130); in transport position – no more than (900×2060×600) mm |
|
| Equipped flaw detector weight | no more than 21 kg | |
| Keypad | English, Russian | |
| Languages | English, Russian | |
| Number of multiplexer units (MUX) | 4 | |
| Number of ultrasonic channels | 14 channels | |
| Connectors | BNC, RS-19 | |
| Data storage | Flash-card | |
| Independent power source | NiMH storage battery with rated voltage 12 V and rated capacity 17 А∙h | |
| Operation time | 8 hours | |
| Flaw detector consumed electric power | no more than 30 V·А | |
| Time of flaw detector operation mode setup | no more than 15 sec. | |
| Display type | 800×480 pixels | |
| Screen dimensions (width, height, diagonal) | 155 mm, 95 mm, 180 mm (7,5 inch) | |
| Warranty | 1 year | |
| INTERFACES | ||
| USB | USB-A (host), USB-B (slave) | |
| Trigger O | available | |
| Headphones | available | |
| Encoder output | 1 axis encoder line | |
| MAIN METROLOGICAL PERFORMANCES | ||
| Temporal instability of sensitivity of flaw detector reception path | 0.5 dB for 8 hours of continuous operation | |
| Protection level in operation | IP 64 | |
| Ambient temperature | from minus 400 to plus 500 С | |
| Atmospheric pressure | from 84 to 106.7 kPa | |
| Relative humidity | (93 ± 3) % at a temperature of 25 ºС | |
| Full average flaw detector lifetime | no less than 10 years | |
| Non-failure operation | no less than 0.9 for 2 000 h | |
| PULSER | ||
| Initial pulse type | short pulse of negative polarity | |
| Initial pulse frequency | one channel mode – 250 Hz; complete mode – no more than 1000 Hz | |
| Amplitude | 180 V | |
| Duration | 60±10 ns | |
| Rising edge duration | no more than 20 ns | |
| Synchronization type | from the initial pulse, from the encoder | |
| RECEIVER | ||
| Gain | from 0 to 100 dB with a step of 0.1, 1, 10 dB | |
| Input signal | no more than 2 V from peak to peak | |
| Input resistance of reception path | no more than 300 Ω | |
| Digital filter | 1 standard digital filter with a centre frequency of 2.5 MHz | |
| Rectifier | envelope | |
| SETUPS MODE | ||
| Measurements | mm | |
| Testing range | from 0 to 1000 mm, with a step of 1, 10, 100 mm | |
| Velocity | from 2000 m/s to 8000 m/s, with a step of 1, 10, 100, 1000 m/s | |
| Probe zero | from 0 to 60 µs, with a step of 0.1, 1 µs. | |
| Range delay | from 0 to 1000 µs, with a step of 1, 10, 100 µs | |
| Refracted angle | from 0 tо 900, with a step of 100, 1000 | |
| ALARM system | ||
| Sound ALARM system | sound – separate for each rail and common (for a group of channels) range of pulse frequency setup of sound indicator of alarm system is from 0.5 to 5 kHz, with setup resolution 100 Hz |
|
| Light ALARM | light – separate for each rail and common (via all sounding channels); visual by the screen – separate for each rail and each channel. | |
| MEASUREMENT IN A-SCAN MODE | ||
| Displayed parameters | 4 measured parameters are displayed in a status bar | |
|
||
| TCG curve | max. number of dots in a gate – 14, dynamic range – 100 dB, vertically adjustable step -1 dB, horizontally adjustable step – 2 dB. | |
| MEASUREMENTS IN B-SCAN MODE | ||
| “Raw” B-Scan |
|
|
[/modal]


